This page explains how to install the Covalent firmware onto two ESP32-C5 devices and connect using the Covalent application for AndroidTM.
Download the pre-compiled firmware binaries (.zip) based on size of your ESP32-C5 flash:
These are merged, ready-to-flash images that contain:
Each .bin file is intended for a separate ESP32-C5 board.
Install Covalent from the Google Play Store:
This app connects to both ESP32-C5 boards over Bluetooth and provides scanning, capture, and control functions.
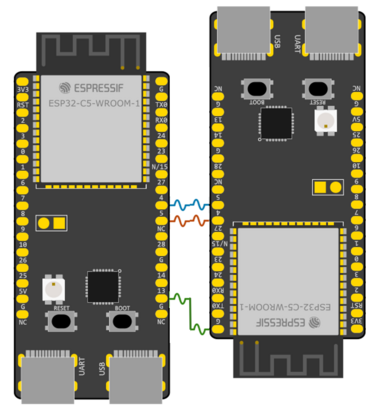
To link NODE 1 and NODE 2 so they can communicate over UART, connect the following pins directly between the two ESP32-C5 boards:
| NODE 1 Pin | Connects To | NODE 2 Pin | Purpose |
|---|---|---|---|
| GPIO 4 (TX) | → | GPIO 5 (RX) | UART transmit → receive |
| GPIO 5 (RX) | → | GPIO 4 (TX) | UART receive ← transmit |
| GND | → | GND | Shared electrical ground |
To flash the firmware, you must install Espressif ESP-IDF on your computer.
Choose ONE of the following options:
Official instructions:
https://docs.espressif.com/projects/esp-idf/en/latest/esp32c5/get-started/
If you use VSCode, you can install the ESP-IDF extension:
https://docs.espressif.com/projects/esp-idf/en/latest/esp32c5/get-started/vscode-setup.html
Either option gives you access to the idf.py and esptool.py flashing tools.
Run the following command from your terminal or VSCode ESP-IDF terminal:
esptool.py --chip esp32c5 write_flash 0x0 ESP32C5-1.bin
esptool.py --chip esp32c5 write_flash 0x0 ESP32C5-2.bin
After flashing completes, unplug and reconnect each board.
Once the two boards are flashed:
On your device:
When connected, you can begin:
.22000 file formatYour setup is now complete.
Android and Google Play are trademarks of Google LLC.